How to Fix a Mac That Suddenly Says Its Disk Is Full (Without Deleting Your Photos)
That “Your disk is almost full” warning feels personal. You barely installed anything, and now your Mac is acting like it’s packed to the ceiling. The scary part is you don’t want to start trashing things and accidentally lose photos, family videos, or important files. The good news is you don’t have to guess. macOS has a built-in, visual cleanup tool that shows you what’s taking space and what’s generally safe to remove, so you can free up gigabytes in minutes without touching your memories.
⚡ In a Hurry? Key Takeaways
- Use Apple menu → About This Mac → Storage → Manage to see what’s actually filling your drive.
- Start with Recommendations (auto-empty Trash, remove watched movies/TV), then Documents → Large Files for big, obvious clutter.
- Delete only what you recognize (old installers, zip files, duplicate downloads). Leave Photos and System stuff alone unless you’re sure.
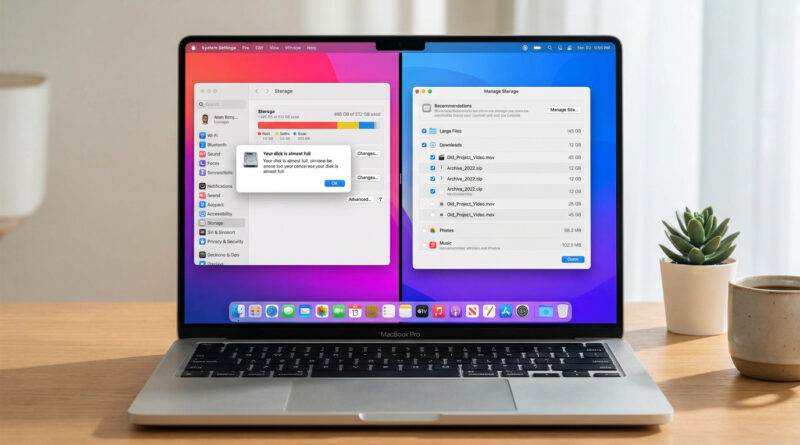
Step 1: Use the Mac’s built-in Storage Manager (it’s the safest place to start)
Click the Apple menu (top-left). Choose About This Mac. Click Storage, then click Manage.
This “Manage Storage” window is your calm, organized view of the mess. It groups files by type and shows you what’s big. No third-party “cleaner” needed.
Step 2: Start with “Recommendations” (big wins, low risk)
Turn on “Empty Trash automatically”
If you have a habit of deleting files and never emptying the Trash, this can instantly stop the slow creep. In Recommendations, enable Empty Trash Automatically. That removes items that have been sitting in Trash for 30+ days.
Remove watched movies and TV shows
Videos are storage bullies. If you’ve downloaded TV seasons or movies and already watched them, this is one of the fastest ways to get space back without touching personal files. In the same Recommendations area, look for options to review and remove large media.
If you’re the kind of person who also uses a Windows PC sometimes, this “built-in cleanup instead of panic-clicking” idea is similar to what I recommend in How to Stop Windows 11 From Randomly Eating Your RAM and Slowing to a Crawl. Different problem, same mindset. Use the tools your system already gives you, and do quick, repeatable maintenance.
Step 3: Go to Documents and sort by “Large Files” (where the mystery usually is)
In the left sidebar, click Documents. Now look for a view like Large Files (or a way to sort by size).
This is where you’ll often find:
- Old installers (things named like “Install macOS…”, “AdobeInstaller…”, or app setup files)
- Zipped folders (.zip) you already unzipped months ago
- Duplicate downloads (same file name with “(1)” or “copy”)
- Huge random files you forgot about, like screen recordings or old meeting videos
Rule of thumb: Only delete what you recognize. If you don’t know what something is, leave it for now and look it up later.
Pro move: Clean out Downloads fast (without digging through your whole Mac)
Your Downloads folder is usually where storage goes to die. Here’s a quick, safe method:
- Open Finder.
- Click Downloads in the sidebar.
- Press Command + J (View Options).
- Set sorting to Date Added (or use Finder’s sort options so older items group together).
- Scroll to anything older than three months and delete what you clearly don’t need.
What’s usually safe here: old .dmg app installers, duplicate PDFs, screenshots you already sent, and zip files. What to be careful with: anything you can’t re-download, like a unique tax document or a one-of-a-kind project file.
What I would NOT delete when you’re stressed
These are common “panic deletions” that cause regret:
- Your Photos library (unless you’re specifically moving it to external storage on purpose)
- Anything labeled System or system-looking folders you don’t understand
- Random folders inside Library (they can be important for apps)
If you’re running out of space because of photos, the safer plan is usually “move or optimize,” not “delete.” But that’s a separate, calmer project.
At a Glance: Comparison
| Feature/Aspect | Details | Verdict |
|---|---|---|
| Manage Storage (Apple menu path) | Shows categories, sizes, and built-in cleanup options in one place. | Best first step. Safe and visual. |
| Recommendations | Auto-empty Trash, review big media, other low-risk suggestions. | Fastest “no drama” space recovery. |
| Downloads cleanup (Command + J, Date Added) | Targets the clutter hotspot. Delete older than three months if clearly not needed. | High payoff. Low risk if you stick to recognizable files. |
Conclusion
Your Mac saying “disk full” doesn’t mean you’ve done anything wrong. It usually means a few hidden giants moved in quietly, like video downloads, old installers, and a bloated Downloads folder. If you start with Apple menu → About This Mac → Storage → Manage, use Recommendations, then sort Documents by Large Files, you can clean up in a calm, controlled way. You’ll free up real space without touching your photos, avoid sketchy cleanup apps, and understand exactly what you’re deleting and why.