
Looking to capture on-screen activities? Wondering how you can make the most of the Screen Recording feature? Well, you’ve come to the right place! In this article, we’ll dive into the world of screen recording and explore the various ways you can utilize this feature to capture and share your on-screen adventures. So grab your popcorn and get ready for a thrilling ride!
Screen recording has become an essential tool for many, whether you’re a content creator, educator, or simply someone who wants to show off their gaming skills. With the ability to capture everything happening on your screen, from video tutorials to live streams, screen recording opens up a world of possibilities. In this article, we’ll discuss the step-by-step process of using the screen recording feature on different platforms, provide tips and tricks to enhance your recordings, and explore the diverse applications of this powerful tool.
So, if you’re ready to take your on-screen activities to the next level, join us on this exciting journey as we uncover the secrets of mastering the art of screen recording. Get ready to hit that record button and let your creativity soar!
- Open the Screen Recording feature on your device.
- Select the area of the screen you want to record.
- Choose any additional settings or preferences.
- Click on the “Record” button to start capturing your on-screen activities.
- When you’re done, click on the “Stop” button to finish the recording.
- Save the recorded video to your desired location.
How to Use the Screen Recording Feature to Capture On-Screen Activities
In today’s digital age, screen recording has become an essential tool for various purposes. Whether you want to create a tutorial, share your gaming achievements, or troubleshoot technical issues, the screen recording feature allows you to capture on-screen activities with ease. In this article, we will guide you through the process of using the screen recording feature on different devices and platforms, so you can unleash your creativity and productivity.
1. Screen Recording on Windows
Windows offers built-in screen recording capabilities that can be accessed through the Xbox Game Bar. To start recording your screen, simply press the Windows key + G to open the Game Bar. From there, click on the “Capture” button and select the “Start Recording” option. You can also customize the recording settings, such as audio capture and video quality, to suit your needs.
Another option for screen recording on Windows is to use third-party software like OBS Studio or Camtasia. These tools provide more advanced features and flexibility, allowing you to record specific areas of the screen, add overlays or annotations, and even live stream your recordings.
1.1 Benefits of Screen Recording on Windows
Screen recording on Windows offers several benefits, including:
- Easy sharing: You can quickly share your recordings with others via email, social media, or file-sharing platforms.
- Troubleshooting: Screen recording can be a valuable tool for troubleshooting technical issues, as it allows you to capture and share the exact steps leading to the problem.
- Training and tutorials: Screen recording is ideal for creating training videos or tutorials, as it enables you to demonstrate processes and concepts visually.
1.2 Tips for Effective Screen Recording on Windows
To make the most out of your screen recording experience on Windows, consider the following tips:
- Plan and script your recordings: Before hitting the record button, it’s helpful to have a clear plan and script in mind. This will ensure that your recordings are concise, organized, and easy to follow.
- Use keyboard shortcuts: Familiarize yourself with the keyboard shortcuts for starting, pausing, and stopping recordings. This will allow you to capture specific moments seamlessly without interrupting your workflow.
- Optimize your settings: Experiment with different recording settings, such as resolution and frame rate, to find the balance between video quality and file size. This is particularly important if you plan to share your recordings online.
2. Screen Recording on macOS
Mac users can take advantage of the built-in screen recording feature called QuickTime Player. To access this feature, open the QuickTime Player application, click on “File” in the menu bar, and select “New Screen Recording.” From there, you can choose the audio source and capture the desired area of your screen.
For more advanced screen recording options on macOS, you can explore third-party software like ScreenFlow or Camtasia. These tools offer additional features such as video editing, annotations, and screen sharing capabilities.
2.1 Benefits of Screen Recording on macOS
Screen recording on macOS provides numerous benefits, including:
- Professional presentations: Screen recording can elevate your presentations by incorporating video demonstrations and visual aids.
- Collaboration and feedback: You can use screen recordings to collaborate with colleagues or receive feedback on your work. By sharing your screen, you can walk others through your thought process or showcase specific features.
- Content creation: Screen recording is a valuable tool for content creators, as it allows them to produce engaging videos for platforms like YouTube or online courses.
2.2 Tips for Effective Screen Recording on macOS
Maximize the effectiveness of your screen recordings on macOS with these tips:
- Utilize audio options: Depending on the purpose of your screen recording, consider whether you need to capture audio from your microphone or the system sound. Adjusting these settings can enhance the overall quality of your recordings.
- Focus on visual clarity: Ensure that the content displayed on your screen is easily readable and visually clear. This is particularly important when recording software demonstrations or tutorials.
- Edit and enhance: Take advantage of video editing software to refine your screen recordings. Trim unnecessary sections, add captions or annotations, and incorporate transitions to create a polished final product.
3. Screen Recording on Mobile Devices
Both iOS and Android devices offer built-in screen recording capabilities, making it easy to capture on-screen activities on the go.
For iOS users, screen recording can be accessed through the Control Center. Simply swipe down from the top-right corner of the screen (iPhone X or later) or swipe up from the bottom of the screen (iPhone 8 or earlier) to open the Control Center. From there, tap on the screen recording icon to start recording. You can customize the recording settings by long-pressing the screen recording button.
Android users can access screen recording by adding the screen recording tile to their Quick Settings panel. To do this, swipe down from the top of the screen to open the notification panel, then tap on the pencil icon or “Edit” button. From there, find the screen recording option and drag it to your Quick Settings panel. Once added, simply tap on the screen recording icon to start capturing your screen.
3.1 Benefits of Screen Recording on Mobile Devices
Screen recording on mobile devices offers several advantages, such as:
- App demonstrations: You can showcase the features and functionality of mobile apps by recording your interactions with them.
- Gaming highlights: Capture your gaming achievements or gameplay footage to share with friends or on social media platforms.
- Remote troubleshooting: Screen recording can be a useful tool for troubleshooting technical issues on mobile devices. By capturing the issue on video, you can provide more accurate information when seeking assistance.
3.2 Tips for Effective Screen Recording on Mobile Devices
Optimize your screen recording experience on mobile devices with these tips:
- Clear notifications: Before starting a screen recording, make sure to clear any sensitive or confidential notifications that may appear on your screen. This will help protect your privacy.
- Record in landscape mode: To ensure optimal viewing experience, record your screen in landscape mode. This is especially important if you plan to share your recordings on platforms like YouTube or social media.
- Use external microphones: If you need to record audio during your screen recording, consider using an external microphone for better sound quality.
Screen recording has revolutionized the way we capture and share on-screen activities. Whether you’re a Windows user, macOS enthusiast, or mobile device aficionado, the screen recording feature empowers you to document your unique experiences and share them with the world. So, unleash your creativity and start exploring the endless possibilities of screen recording today!
Key Takeaways: How to Use the Screen Recording Feature to Capture On-Screen Activities
- Screen recording allows you to record what’s happening on your computer or mobile device screen.
- You can use screen recording to create tutorials, demonstrate software, or capture gameplay.
- On a Windows computer, press the Windows key + G to open the Game Bar and start screen recording.
- On a Mac, use the built-in QuickTime Player or download third-party screen recording software.
- Make sure to adjust the recording settings, choose the desired area to capture, and save the recording in a suitable format.
Frequently Asked Questions:
1. What is the Screen Recording feature and how can I access it?
The Screen Recording feature allows you to capture on-screen activities, such as demonstrations, tutorials, or gameplay, by recording everything happening on your computer or mobile device screen. To access this feature, follow these steps:
1. On a Windows computer, press the Windows key + G to open the Game Bar. Then, click on the “Record” button.
2. On a Mac computer, press Command + Shift + 5 to open the screen recording toolbar. Click on the “Record” button.
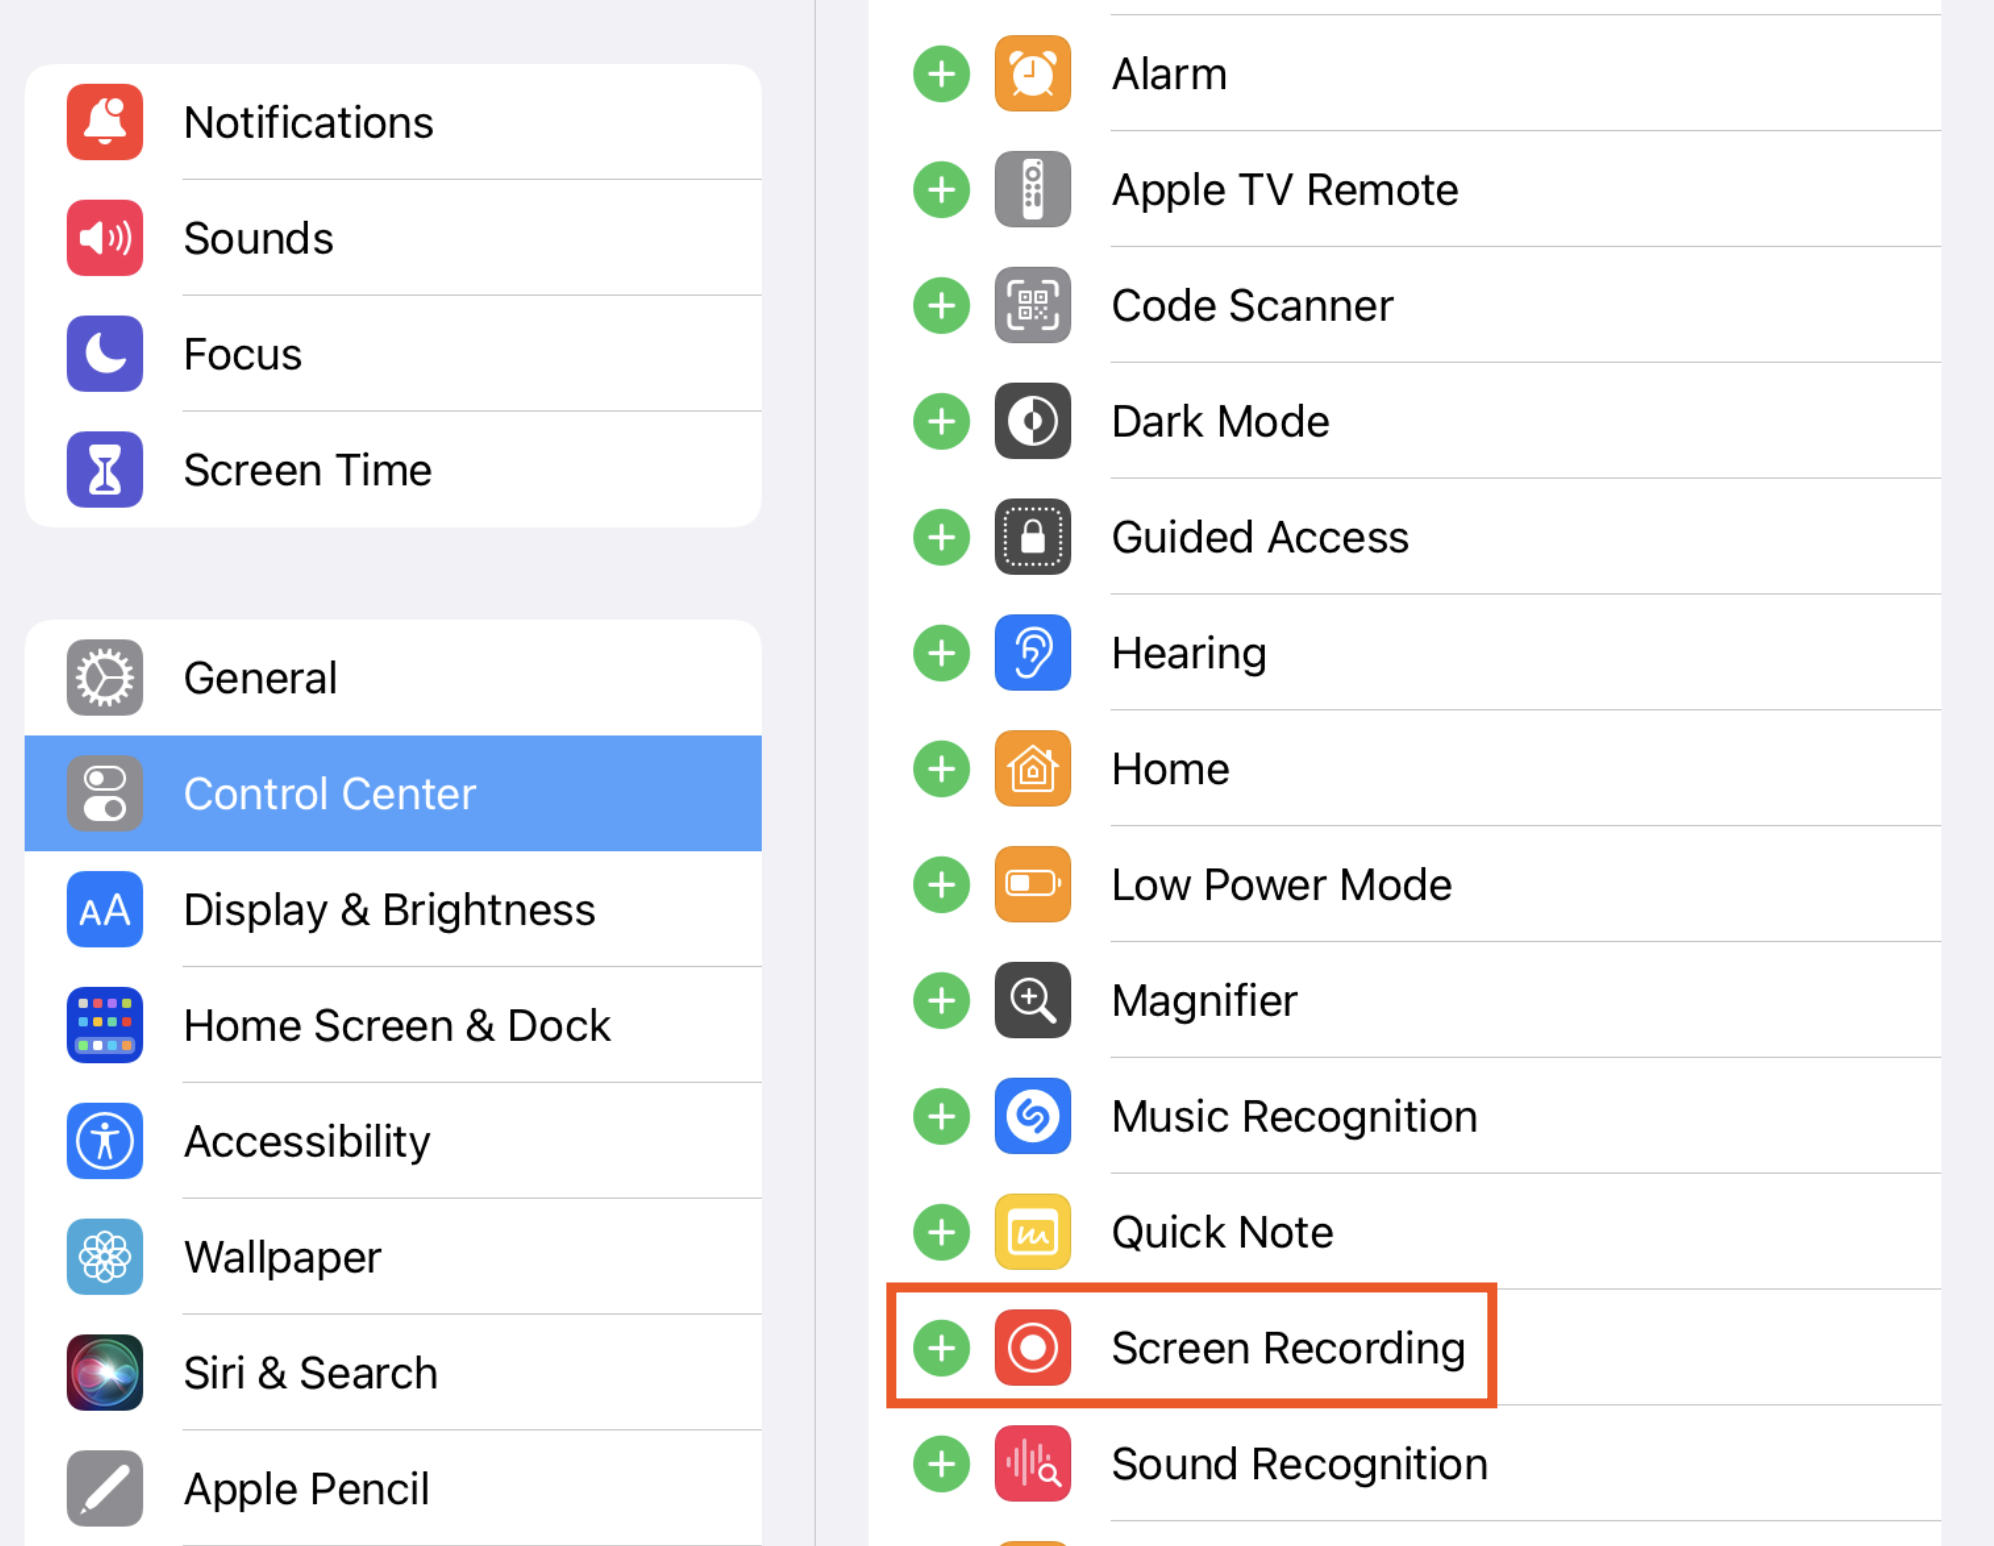
3. On an iPhone or iPad, go to Settings > Control Center > Customize Controls. Add the “Screen Recording” option. Then, swipe up from the bottom of the screen and tap the screen recording button.
4. On an Android device, swipe down from the top of the screen to open the notification panel. Look for the “Screen Record” or “Screen Capture” option and tap on it.
2. Can I customize the settings for screen recording?
Yes, you can customize the settings for screen recording to suit your needs. Some of the settings you can adjust include:
– Audio input: You can choose to record audio from your device’s microphone or system sound.
– Video quality: You can select the resolution and frame rate for the recorded video.
– Recording duration: You can set a specific duration for the recording to automatically stop after a certain amount of time.
– Storage location: You can choose where the recorded videos are saved on your device.
3. How can I start and stop a screen recording?
To start a screen recording, follow these steps:
1. Open the screen recording feature as mentioned in the first question.
2. Click or tap on the record button to start the recording. You may need to select the area of the screen you want to record.
To stop a screen recording, click or tap on the stop button in the recording toolbar or notification panel.
4. Can I edit the recorded screen activities?
Yes, you can edit the recorded screen activities using video editing software. After you finish recording, you can import the recorded video into a video editing program and make edits such as cutting out unwanted parts, adding text or captions, or enhancing the video quality.
There are various video editing software available, both free and paid, that offer a range of editing features. Some popular options include Adobe Premiere Pro, iMovie, and Windows Movie Maker.
5. How can I share the recorded screen activities with others?
Once you have finished recording and editing your screen activities, you can easily share the video with others. Here are a few ways to do it:
– Upload to a video sharing platform: You can upload the video to platforms like YouTube, Vimeo, or Dailymotion and share the link with others.
– Send via email or messaging apps: You can attach the video file to an email or send it via messaging apps like WhatsApp or Telegram.
– Share on social media: You can share the video on social media platforms like Facebook, Instagram, or Twitter.
– Save to a cloud storage service: You can upload the video to a cloud storage service like Google Drive or Dropbox and share the download link.
Choose the method that suits your preferences and the intended audience for your recorded screen activities.
Final Thoughts
So there you have it, folks! Now you know how to harness the power of the Screen Recording feature to capture all those on-screen activities that you don’t want to miss. It’s like having your own personal movie director, but instead of filming Hollywood blockbusters, you’re creating informative and engaging content right from your computer screen.
With just a few simple clicks, you can record tutorials, gameplay, presentations, and so much more. The possibilities are endless! Whether you’re a content creator, educator, or just someone who loves sharing their knowledge and skills, the Screen Recording feature is your new best friend.
So go ahead and get creative! Capture those on-screen moments, add your own personal touch, and share it with the world. Who knows, you might just become the next viral sensation or help someone solve a problem they’ve been struggling with. Remember, the sky’s the limit when it comes to screen recording, so start exploring and let your creativity shine!
And don’t forget, if you ever need a refresher or want to learn more about the Screen Recording feature, simply refer back to this article. We’ve got you covered. Happy recording!