How to Free Up Space on a Windows or Mac Laptop Without Deleting Photos
That “disk almost full” warning is the worst. Your laptop slows down, updates fail, and suddenly you feel like you’re one wrong click away from losing years of photos and personal files. To make it harder, the built-in storage screens can feel like a jumble of mystery categories. Here’s the safe, confidence-building move I want you to try first: clean up your Downloads folder, not your Photos folder, not your system files. Downloads is where big installers, random video files, duplicates, and “I’ll deal with it later” stuff piles up. Sort it by size, keep what you still want by moving it to a free cloud drive, trash the rest, then empty the Recycle Bin or Trash. That one focused sweep often frees up gigabytes in minutes, without touching your memories.
⚡ In a Hurry? Key Takeaways
- Start with the Downloads folder, sort by size, and remove the biggest junk first.
- Move large files you still want to a free cloud drive (or external drive), then delete the local copy.
- Nothing truly frees space until you empty Recycle Bin or Trash. Do that last.
The “Safe Zone” Rule: Don’t Start With Photos or System Stuff
If you’re nervous, you’re normal. Photos and Documents feel personal. System folders feel risky. So don’t start there.
Downloads is different. It’s usually a staging area for things you already got from somewhere else. App installers, ZIP files, big email attachments, podcasts, random videos, duplicate PDFs. That’s why this works so well.
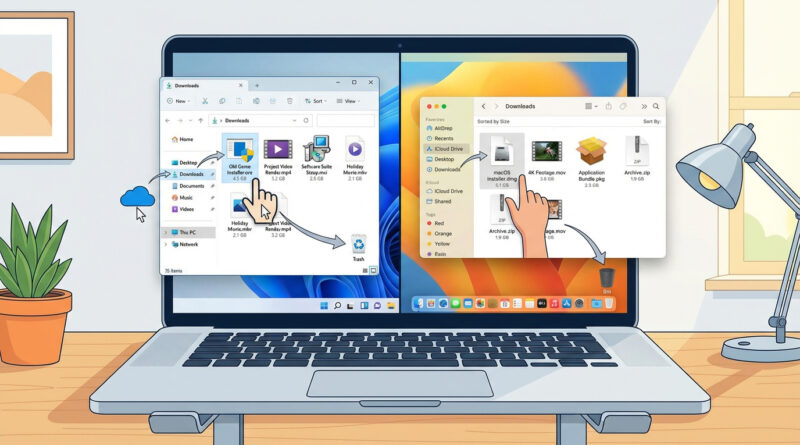
Step 1 (Windows): Sort Downloads by Size and Make Quick Wins
Find the biggest stuff first
1) Open File Explorer.
2) Click Downloads on the left.
3) Switch to Details view (it’s easier to sort).
4) Click the Size column to sort biggest to smallest.
Now you’re looking at the files that actually matter for space.
What’s usually safe to delete from Downloads?
Common space hogs that are typically safe:
- .exe or .msi installers for apps you already installed (Chrome, Zoom, printers, games).
- .zip or .rar files you already extracted.
- Old video files you downloaded to watch once.
- Duplicates with names like “(1)” or “- Copy”.
If you’re unsure about a file, don’t delete it yet. Move it to a “Decide Later” folder on your Desktop for now.
Step 1 (Mac): Sort Downloads by Size Without Guesswork
Get a clear “biggest first” view
1) Open Finder.
2) Click Downloads in the sidebar.
3) Choose View then as List.
4) If you don’t see file sizes, go to View then Show View Options, and enable Size.
5) Click the Size column to sort.
Mac downloads that are usually safe to remove
- .dmg files (app installers) after the app is installed.
- .pkg installers you used once.
- Old iPhone/iPad update files you downloaded.
- ZIP files you already opened.
Step 2: Move “Keep” Files to a Free Cloud Drive (Then Remove the Local Copy)
Here’s the trick that keeps this feeling safe. You don’t have to choose between “keep forever” and “delete forever.”
Pick a free cloud option you already have, like:
- Windows: OneDrive (often built in)
- Mac: iCloud Drive
- Either: Google Drive, Dropbox (free tiers)
Create a folder called something like Big Files From Downloads. Drag the few large items you truly care about into it. Wait for upload/sync to finish, then delete the originals from Downloads.
This is the same “let the system finish its housekeeping, then clean up the obvious hogs” mindset I recommend on phones after updates. If you’ve also been dealing with post-update weirdness on your iPhone, see How to Stop Your iPhone Battery From Draining Fast After an iOS Update.
Step 3: Empty the Recycle Bin or Trash (This Is the Part People Miss)
Deleting files usually just moves them to a holding area.
Windows
Right-click Recycle Bin on the desktop, then choose Empty Recycle Bin.
Mac
Right-click the Trash in the Dock, then choose Empty Trash.
If you skip this step, you might feel like you cleaned up but your free space barely changes.
If You Still Need More Space (Still Without Touching Photos)
Uninstall apps you don’t use
Windows: Settings, Apps, Installed apps. Sort by size and remove games or old tools you don’t need.
Mac: Applications folder. If it’s a drag-and-drop app, you can usually drag it to Trash. (Some apps also include uninstallers.)
Clear browser downloads and offline files
Browsers can keep big offline files and repeated downloads. If you cleaned Downloads but it keeps refilling, check your browser’s download location and habits.
Check your cloud sync settings
If you use OneDrive or iCloud Drive, you can often set older files to “online only” so they don’t take local space. This does not delete them from the cloud. It just removes the local copy.
At a Glance: Comparison
| Feature/Aspect | Details | Verdict |
|---|---|---|
| Fastest space win | Sort Downloads by size, delete installers/ZIPs/videos, then empty bin | Best first move for most people |
| Safest “keep it” option | Move large keepers to free cloud storage, confirm sync, delete local copy | Low risk, high confidence |
| Biggest long-term fix | Uninstall unused large apps and set cloud files to online-only | Great follow-up if you’re still tight on space |
Conclusion
You don’t need to play storage roulette or touch your photos to get your laptop breathing again. Start with Downloads, sort by size, move the few big “keepers” to a free cloud drive, trash the rest, then empty the Recycle Bin or Trash. It’s quick, it’s controlled, and it builds confidence. That matters even more right now, because recent OS and app updates quietly take more space than they used to. A simple cleanup today can stop the warnings, speed things up, and keep your memories right where they belong.