How to Fix iPhone Photos That Look Blurry or Washed Out After iOS Updates
If your iPhone photos suddenly look a little blurry, grainy, or weirdly bright after an iOS update, you are not imagining it. Apple tweaks the camera processing all the time, and it can make the same scene look softer or more “smoothed” than before. The annoying part is there is no single “make it normal again” switch. So instead of hunting through a dozen settings, do one tiny home test that tells you what actually works on your phone.
Pick a simple “test scene” you can repeat, like a bookshelf, a plant near a window, or anything with small details and both light and shadow. Then take the same photo a few times using only three changes: turn off Live Photo, lock focus on the subject, and nudge exposure a bit darker. You will get a clear before-and-after in two minutes, and you can make those three steps your default habit for more consistent shots.
⚡ In a Hurry? Key Takeaways
- Use one repeatable “test scene” and compare photos before you change anything else.
- For most people, the winning combo is: Live Photo Off, press-and-hold to lock focus, then slide exposure slightly darker.
- This is safe, fast, and reversible. You are not “breaking” your camera. You are just taking control back from automatic processing.
Why your photos can look worse after an iOS update
Most of the time, the lens did not suddenly get bad. What changed is the software that decides how your photo should look. iOS updates can adjust things like sharpening, noise reduction (that “waxy” smoothing), HDR brightness, and how the iPhone blends multiple frames together.
That can lead to a few common complaints:
- Soft details: the phone is reducing noise more aggressively, which also wipes out fine texture.
- Washed-out or too bright: HDR is lifting shadows and midtones, sometimes more than you want.
- Grain in indoor shots: the phone is pushing ISO higher, then trying to clean it up after.
This is why “just clean the lens” sometimes helps, but often it does not. The bigger problem is your iPhone is making different automatic choices than it used to.
The 2-minute reset: make a simple test scene at home
Here is the trick: stop judging your camera based on random moments. Create one controlled scene so you can see cause and effect.
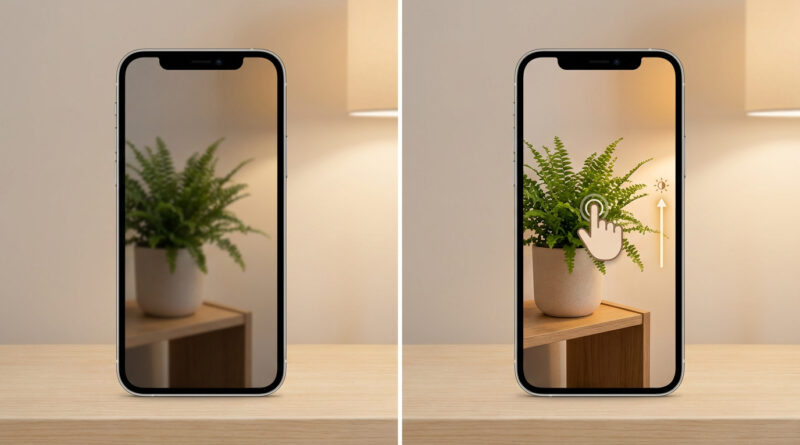
Step 1: Pick a repeatable subject
Choose something with texture and edges. A bookshelf, a houseplant, a patterned blanket, cereal boxes, anything with small text. Put it in decent light if you can (near a window is perfect). Do not change the lighting between shots.
Step 2: Take a baseline photo (no changes)
Open the Camera app and take one normal shot. This is your “before.”
Step 3: Apply only these three tweaks
1) Turn off Live Photo. In the Camera app, tap the Live Photo icon at the top (it looks like concentric circles) so it turns off. Live Photo can add motion blur in low light and can also affect how the phone chooses frames.
2) Lock focus. Press and hold on your subject until you see AE/AF LOCK. This stops the camera from refocusing at the last second or hunting on high-contrast edges.
3) Slide exposure a little darker. After you tap the subject, you will see a little sun icon. Slide it down just a bit. You are not trying to make the photo “dark.” You are trying to stop iOS from over-brightening and washing out details.
Now take the same photo again from the same spot. This is your “after.”
How to judge the results (without photo jargon)
Open Photos and flip between the two shots. Zoom in a little on something detailed, like book titles, leaf veins, or fabric texture.
- If the “after” looks clearer, make those three steps your new habit, especially indoors.
- If it looks too dark, slide exposure down less. Tiny adjustments matter.
- If it still looks soft, try the same test scene in brighter light. If the phone is fighting low light, no setting will fully fix that.
Make it a default habit (so you stop thinking about it)
The goal is not to turn you into a camera nerd. It is to rebuild trust quickly.
- Live Photo Off when you care about sharpness (kids, pets, indoor scenes).
- Press-and-hold to lock when the camera keeps changing its mind.
- Expose slightly darker when faces look too bright or backgrounds look foggy.
After a couple days, these become muscle memory.
A quick note about “updates changed my stuff”
This photo issue is the same kind of frustration people hit on laptops after updates. The fix is often a controlled test and a simple rollback plan, not random toggling. If you are dealing with Windows updates too, this guide is worth bookmarking: How to Stop Windows 11 From Randomly Restarting After Updates. Same idea. Set yourself up so you can diagnose fast and recover quickly.
At a Glance: Comparison
| Feature/Aspect | Details | Verdict |
|---|---|---|
| Live Photo | Can pick a slightly different frame and add subtle blur, especially indoors or with movement | Turn it off for sharper “must-keep” shots |
| Focus behavior | Auto-focus can hunt or shift right before the shutter, which reads as “soft” | Use AE/AF Lock on your subject |
| Exposure / brightness | Newer processing often lifts brightness and shadows, which can wash out texture | Slide exposure slightly darker for cleaner detail |
Conclusion
If your iPhone camera feels like it got worse overnight, the fastest fix is not a deep settings hunt. It is one repeatable test and three small habits that put you back in control. Live Photo off. Lock focus. Nudge exposure down. You will see, in your own “test scene,” what actually helps on your specific iPhone. That turns random frustration into a short, controlled experiment, and it gets your confidence back fast.